Export animation cels [EX]
You can export the animation cels in the animation folder corresponding to the current animation as BMP, JPEG, PNG, TIFF or Targa images.
|
|
·Actions set up in 2D camera folders are not reflected in the exported file. ·How to specify the save location differs when using an iPad/iPhone. The Files app is displayed after the [Export animation cels] dialog box is set. Select the save folder, then tap [Save]. Select the [File] menu > [Open] to display the exported file. ·When using an Android/Chromebook, the [File operation/Share] dialog box will be displayed after the [Export animation cels] dialog box. To open the exported data, go to the [File operation/Share] dialog box, select [Export], and export the data to the device. For details, see "Exporting files saved in Clip Studio Paint to storage". |
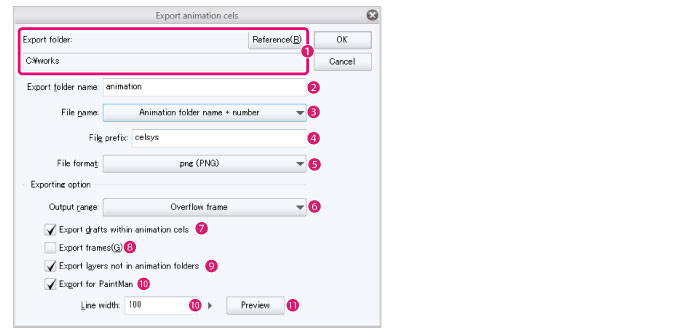
[Export animation cels] dialog box

(1) Export folder [Windows/macOS]
Click [Browse] to specify the destination folder.
(2) Export folder name
Enter a name for the file export folder.
(3) File name
Select a format for the file names. You can choose from the [Cel name], [Serial number], [Animation folder name + cel name], or [Animation folder name + number]. For [Cel name], the cel names in the animation folder will be used as the file names.
(4) File prefix
You can add text as a prefix to the file names.
(5) File format
Specify the file format to export the images. You can select a format from BMP, JPEG, PNG, TIFF and Targa.
(6) Export range
Specify the area of the images to be exported. You can select from [Overflow frame] and [Entire canvas].
(7) Export drafts within animation cels [EX]
Turning this on merges the draft layers when exporting images. If [Export for PaintMan] is turned on, the draft layers will be exported as shadow planes.
(8) Export frames
Turning this on exports the overflow frames as they currently appear.
(9) Export layers not in animation folders
Turning this on merges and exports layers that are not contained in animation folders.
|
|
·Turning on [Export for PaintMan] will binarize the layers outside of the animation folder. ·This method cannot export selection layers, quick masks, or paper layers. It also cannot export any hidden layers. |
(10) Export for PaintMan
Turn this on to process and export the image for PaintMan. As with binary tracing in TraceMan, the content is binarized and separated into main lines and color tracing lines (red, blue, green, etc.). This makes it possible to import the image with the content separated into a main plane and color plane when importing the image in PaintMan.
If you draw the fill colors for specified shadows on a draft layer, PaintMan can reduce the colors and import this content as a shadow plane.

(11) Line width
Allows you to set the line width when exporting for PaintMan. This item can be set when [Export for PaintMan] is turned on.
(12) Preview
Click this to display the [Line width preview] dialog box. A preview appears to show how the image will look when it is exported for PaintMan. The [Line width] setting can also be changed while checking the preview. This item can be set when [Export for PaintMan] is turned on.
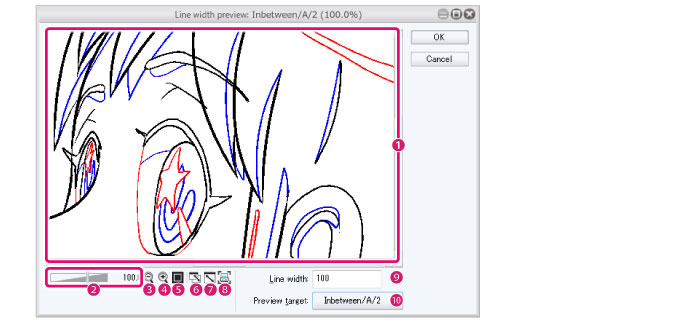
[Line width preview] Dialog Box

|
(1) Preview window |
Shows how the image will look when it is exported for PaintMan. |
|
(2) Scale up/down slider |
Drag the slider to adjust the scale of the preview window. You can also adjust the size by directly inputting a value. |
|
(3) Zoom out |
Click to scale down the image in the preview window. |
|
(4) Zoom in |
Click to scale up the image in the preview window. |
|
(5)100% |
Click to scale the image in the preview window to 100%. |
|
(6) Fit to navigator |
Click to display the image in the preview window fit to the dialog box size. When the size of the window is adjusted, the image preview will change size accordingly. |
|
(7) Fit to Screen |
Click to display the image in the preview window fit to the size of the current dialog box. When the size of the window is adjusted, the image preview will not change size. |
|
(8) Print size |
Click to display the image in the preview window in the print size. If a display resolution has not been set, a message will appear to prompt you to set the display resolution. Clicking [OK] shows the [Settings of display resolution] dialog, where you can set a display resolution. For details on the [Settings of display resolution] dialog box, see "Display resolution". |
|
(9) Line width |
Allows you to set the line width for exporting. Changes to the line width are shown in the preview. |
|
(10) Preview target |
Opens a menu where you can select the cel to be displayed in the preview window. |


