Brush shape → Brush tip
Configures the shape of the brush tip. Some brush shapes allows you to combine multiple tip shapes to create a multi-brush.

|
|
Some settings may not display depending on the selected tool or sub tool. |
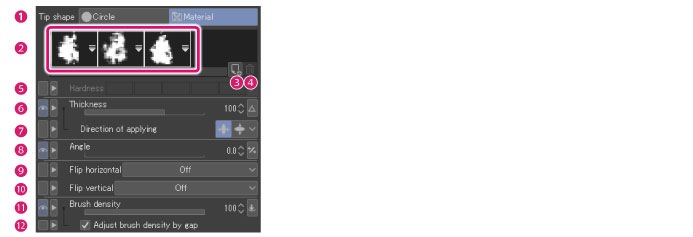
(1) Tip shape
Select the brush tip shape from [Circle] and [Material]. Selecting [Material] allows you to change the brush shape as well as use multiple brush shapes combined.
(2) Brush tip
Displays the shape of the brush tip configured in the selected brush shape. When multiple brush shapes are displayed, you can change their display order by drag and drop.
Clicking ▼ on the right of the brush tip shape displays the [Select brush tip shape] dialog box where you can change the material for the brush tip.
|
|
You can scroll through the brush tips by dragging left and right through the brush shape tips while holding down the space bar. |
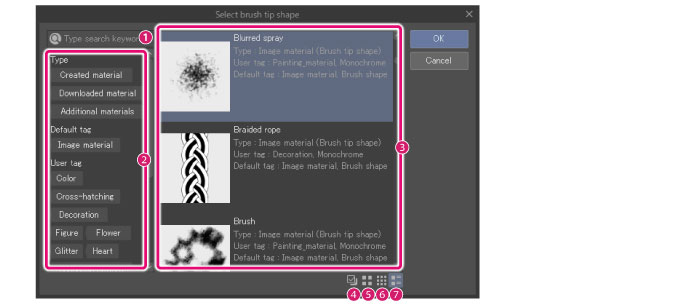
[Select brush tip shape] Dialog Box

|
(1) Search box |
Allows you to input a keyword and search for a brush tip shape. |
|
(2)Tag list |
A list of tags assigned to materials displayed as buttons. Clicking a button displays brush shapes meeting the specified information in [Brush tip shape list]. |
|
(3)Brush tip shape list |
Displays the list of brush tip shapes. |
|
(4)Show item checkbox |
Shows a checkbox for each thumbnail of the materials shown in [Material list]. You can select a material by turning on the checkbox. |
|
(5)Thumbnail [Large] |
Shows the large thumbnails of the brush tip shapes shown in [Brush tip shape list]. |
|
(6)Thumbnail[Small] |
Shows the small thumbnails of the brush tip shapes shown in [Brush tip shape list]. |
|
(7)Thumbnail [Detail] |
Shows the thumbnails as well as information of the brush tip shapes shown in [Brush tip shape list]. |
(3) Add brush tip shape
Adds a material to [Brush tip].
Clicking displays the [Select brush tip shape] dialog box. Select the brush tip shape to add from the list of brush materials. Clicking [OK] adds the material to [Brush tip].
|
|
Selecting materials while holding down the [Ctrl] key or [Shift] key allows you to select multiple materials. |
(4) Delete brush tip shape
Deletes the brush tip shape selected in [Brush tip].
(5) Hardness
Configures the effect of the hardness. The smaller the value, the more blurred will be the lines.
(6) Thickness
Adjusts the thickness of the brush tip. The [Dynamics] button allows you to select the settings of the tablet and the like which affect the thickness of the brush tip.
For more information on dynamics, see "Dynamics settings" .
(7) Direction of applying
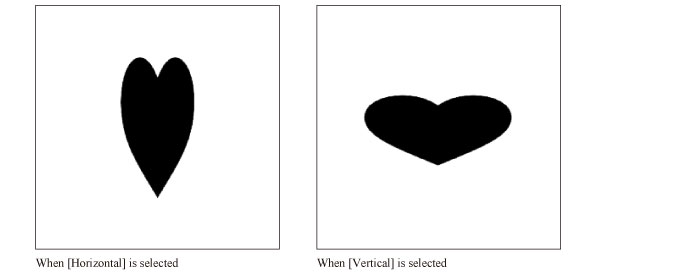
Configure the direction to which the brush thickness will apply.
|
Horizontal |
The thickness changes in the horizontal direction. |
|
Vertical |
The thickness changes in the vertical direction. |

(8) Direction
Allows you to configure the direction of the brush tip. Moving the slider changes the direction of the brush tip from 0 to 360 degrees. The [Dynamics] button allows you to select the settings of the tablet and the like which affect the direction of the brush.
For more information on dynamics, see "Dynamics settings (Direction)" .
(9) Flip horizontal
Detail see Clip Studio TIPS.
(10) Flip vertical
Detail see Clip Studio TIPS.
(9) Brush density
Configures the opacity of each tip hair of the selected brush. The [Dynamics] button allows you to select the settings of the tablet and the like which affect the brush density. For example, configuring [Pen pressure] for [Dynamics] makes it easier to vary the tone in accordance with the pen pressure.
For more information on dynamics, see "Dynamics settings" .
(10) Adjust brush density by gap
When turned on, the brush density is configured to decrease when gap becomes narrow. The density is automatically adjusted so that opacity in the selected area is approximately constant.
|
|
For brush [Gap], see "Brush shape → Stroke" . |


