Tab-Mate Controller [Windows]
Assigns Clip Studio Paint operations to the Tab-Mate Controller (sold separately). Furthermore, assigns commands to the Tab-Mate Controller's Quick Menu.
Tab-Mate Controller settings
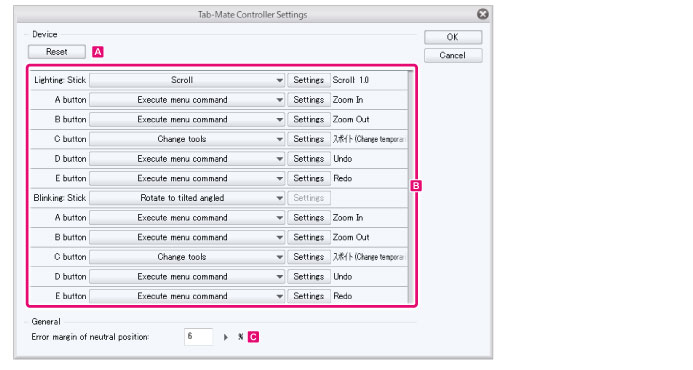
You can assign Clip Studio Paint operations to the Tab-Mate Controller. It also allows you to adjust the sensitivity of the control stick when it is in the center.
|
|
For details on purchasing the Tab-Mate Controller (sold separately), see “CLIP STUDIO NET”. |

A.Reset
Initializes the Tab-Mate Controller settings.
B.Function settings
You can assign Clip Studio Paint operations to the Tab-Mate Controller.
Functions that can be set vary depending on whether they will be assigned to the control stick or buttons.
|
|
For names of Tab-Mate Controller parts, see "Names and Functions of Parts of the Tab-Mate Controller". |
(1) Setting up a control stick
Functions you can set to the control stick are as follows.
Disable
Does not assign any function to the control stick.
Scroll
Scrolls the canvas in the direction the control stick is tilted.
Clicking [Settings] opens the [Settings of canvas operation] dialog box. In the dialog box, you can set the scroll amount for the canvas.

|
Scroll |
By moving the slider, set the amount by which the canvas will displace. The larger the value, the larger will be the amount by which the canvas will displace. |
|
Fix speed |
Turning on this item displaces the canvas at a fixed speed. If turned off, the speed at which the canvas will displace will be proportional to the degree the control stick is tilted. |
Rotate to tilted angle
Rotates the canvas in the direction the control stick is tilted.
Rotate by turning
·Rotating the control stick clockwise rotates the canvas clockwise.
·Rotating the control stick counterclockwise rotates the canvas counterclockwise.
Clicking [Settings] opens the [Settings of canvas operation] dialog box. In the dialog box, you can set the rotation amount for the canvas.

|
Rotate |
By moving the slider, set the amount by which the canvas will rotate. The larger the value, the larger will be the amount by which the canvas will rotate. |
Zoom by turning
·Rotating the control stick clockwise zooms in the canvas.
·Rotating the control stick counterclockwise zooms out the canvas.
Clicking [Settings] opens the [Settings of canvas operation] dialog box. In the dialog box, you can set the zoom amount for the canvas.

|
Zoom |
By moving the slider, set the amount by which the canvas will rotate. The larger the value, the larger will be the amount by which the canvas will zoom in/out. |
Zoom by up/down, rotate by left/right
·Tilting the control stick upward zooms in the canvas.
·Tilting the control stick downward zooms out the canvas.
·Tilting the control stick to the right rotates the canvas clockwise.
·Tilting the control stick to the left rotates the canvas counterclockwise.
Clicking [Settings] opens the [Settings of canvas operation] dialog box. In the dialog box, you can set the rotation amount and zoom amount for the canvas.

|
Zoom |
By moving the slider, set the amount by which the canvas will zoom in/out. The larger the value, the larger will be the amount by which the canvas will zoom in/out. |
|
Rotate |
By moving the slider, set the amount by which the canvas will rotate. The larger the value, the larger will be the amount by which the canvas will rotate. |
|
Fix speed |
Turning on this item zooms in/out or rotates the canvas at a fixed speed. If turned off, the speed at which the canvas will zoom in/out or rotate will be proportional to the degree the control stick is tilted. |
Brush
·Tilting the control stick upward increases the brush size.
·Tilting the control stick downwards decreases the brush size.
·Tilting the control stick right increases the brush size.
·Tilting the control stick left decreases the brush size.
Timeline
·Tilting the control stick upward moves the frame of the [Timeline] palette forward.
·Tilting the control stick downward moves the frame of the [Timeline] palette backward.
·Tilting the control stick right moves the frame of the [Timeline] palette forward.
·Tilting the control stick left moves the frame of the [Timeline] palette backward.
Parallel line ruler
Rotating the control stick rotates the parallel line ruler on the canvas.
(2) Buttons
Selecting the function to set from the pull down menu displays the related dialog box for you to set the function.
|
|
Clicking [Settings] also displays the related dialog box. |
Disable
Does not assign any function to the button.
Execute menu command
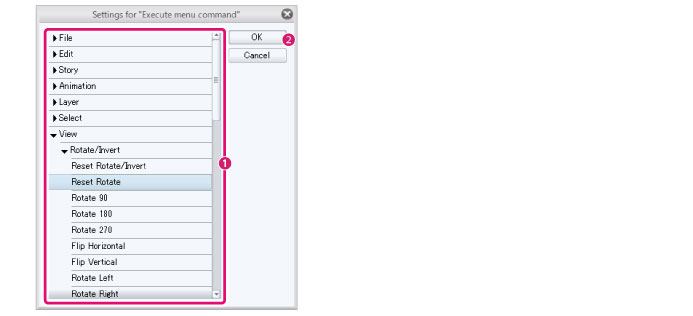
Assigns a Clip Studio Paint menu item to the button. Set the content on the dialog box.

(1) Select the menu item from the dialog box.
(2) Click [OK] to assign the function.
Execute option command
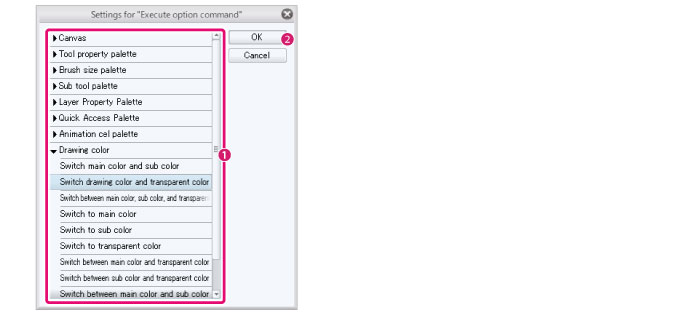
Assigns an auxiliary operation of the items below to the button.
·Canvas
·Tool Property
·Brush Size
·Sub Tool
·Layer Property
·Drawing color
Set the content on the dialog box.

(1) Select the item from the dialog box.
(2) Click [OK] to assign the function.
Change tools
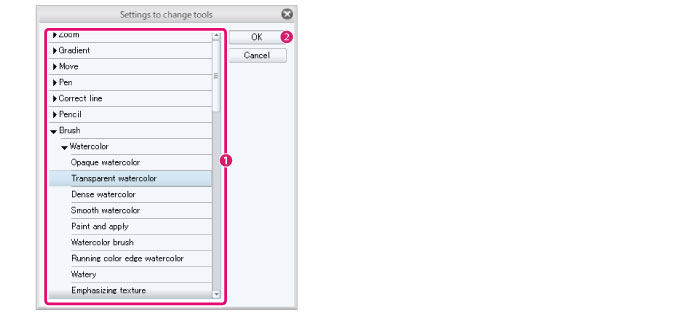
Switches a tool or sub tool temporarily when the button is pressed. Set the content on the dialog box.

(1) Select the tools and/or sub tools from the list.
(2) Click [OK] to assign the function.
|
|
Sub-menu commands can be displayed or hidden in the following ways: ·Click the leftmost arrow symbol. ·Double-click the item name. |
Allocate modifier key
Makes a button work in the same way as when a modifier key (Ctrl, Shift, Alt, or Space) is pressed. Set the content on the dialog box.

(1) Select the modifier key to assign. Selecting multiple items is equivalent to pressing multiple modifier keys simultaneously.
(2) Click [OK] to assign the function.
C.Error margin of neutral position
Adjusts the sensitivity of the control stick when it is in its center. When conditions such as a canvas not scrolling as operated, or a canvas scrolling on its own occur, they may be improved by adjusting this value.


