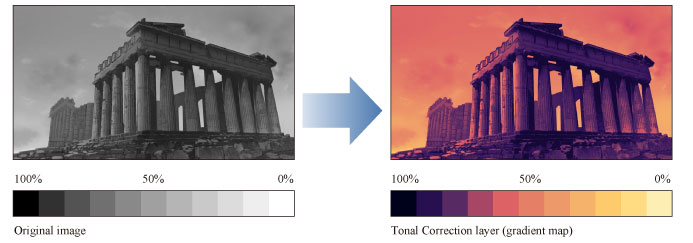
Tonal Correction layer (Gradient map)
Select the [Layer] menu > [New Correction Layer] > [Gradient map] to create a correction layer that converts the colors of the original layer to the gradient based on the density of the original colors.

|
|
Tonal Correction gradient map layers from versions 1.3.1 or earlier are not supported in later versions. |
|
|
·This section describes how to create a tonal correction layer, using the example of Gradient Map. For details, please refer to "Creating a tonal correction layer". ·For information on how to edit a Tonal Correction layer, see "Changing the area of a tonal correction layer". ·For information on the settings in the [Gradient map] dialog box, please see the following section. |
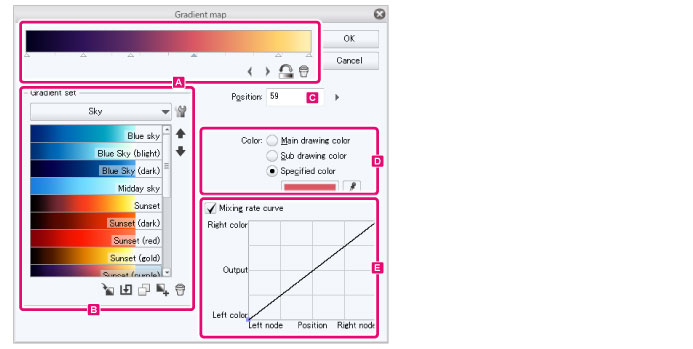
[Gradient map] dialog box

A.Gradient settings
Create a gradient by moving the nodes.

(1) Color bar
A preview of the gradient.
(2) Node
Adjust the color of the gradient using the nodes. You may create multiple nodes. Click an empty space to add a node.
You can drag the nodes horizontally to adjust the tone of the gradient. When a node is selected, the icon will be highlighted.
To delete a node, drag it vertically off the color bar.
(3) Select left node
Switches the selected node to the next node on the left.
(4) Select right node
Switches the selected node to the next node on the right.
(5) Reverse gradient
Inverts the gradient settings.
(6) Delete node
Deletes the selected node.
B.Gradient set
Manage gradient settings.

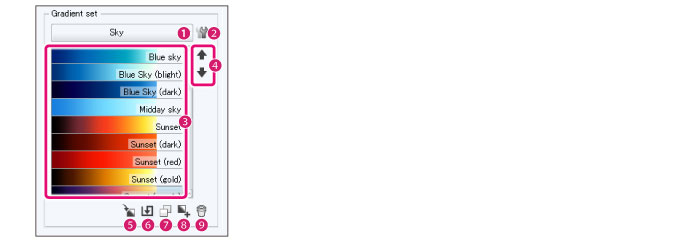
(1) Show Gradient Sets
Displays the [Gradient set] list and make a selection.
(2) Show Menu
Displays the gradient set menu.
|
Create new set |
Create a new color gradient data set. |
|
Delete set |
Deletes the selected gradient set. |
|
Duplicate set |
Duplicates the selected gradient set. |
|
Settings of set |
Change the name of the selected gradient set. |
|
Register set as material |
Displays the [Material property] dialog box, where you can register the selected gradient set to the [Materials] palette. For details on the [Material property] dialog box, see "[Material property] Dialog Box". |
|
Import material set |
Displays the [Import material set] dialog box, where you can import a gradient set registered to the [Materials] palette. For details on the [Import material set] dialog box, see "[Import material set] dialog box". |
|
Add Gradient |
Add the settings of the gradient displayed on the color bar to the list. The added gradient settings are displayed at the bottom of the list. |
|
Delete Gradient |
Deletes the gradient settings selected in the list. |
|
Duplicate Gradient |
Duplicates the selected gradient settings. |
|
Change Gradient Name |
Change the name of the selected gradient settings. |
|
Replace Gradient |
Overwrites the settings selected in the list with the settings of the gradient displayed in the color bar. |
|
Apply to Gradient Settings |
Imports the gradient settings selected from the list into the color bar. |
|
Import Gradient |
Import a gradient settings file from IllustStudio (extension: cgs). Gradient settings file from IllustStudio (extension: cgs) cannot be imported on tablets/smartphonea/Macs with M1 chips. |
(3) Gradient list
A list of gradient settings included in the current gradient set.
(4) Up/Down
Move the display position of the selected gradient settings up or down.
(5) Replace Gradient
Overwrites the settings selected in the list with the settings of the gradient displayed in the color bar.
(6) Apply to Gradient Settings
Imports the gradient settings selected from the list into the color bar.
(7) Duplicate Gradient
Duplicates the selected gradient settings.
(8) Add Gradient
Adds the settings of the gradient displayed on the color bar to the list. The added gradient settings are displayed at the bottom of the list.
(9) Delete Gradient
Deletes the gradient settings selected in the list.
C.Position
Set the position of the selected node.
D.Color
Set the color of the selected node.

(1) Main drawing color
Uses the main drawing color as the node color. If you change the main drawing color with a color palette, the node color will also change.
(2) Sub drawing color
Uses the sub drawing color as the node color. If you change the sub drawing color with a color palette, the node color will also change.
(3) Specified color
Specify a color for the node. Click the color indicator to open the [Color settings] dialog box.
(4) Obtain screen color [Windows/macOS]
You can use the eyedropper to pick a color from the screen as the specified color.
E.Mixing rate curve
Allows you to adjust the change in color between the selected node and the node to the right.

·The horizontal axis of the graph indicates the position of the nodes.
·The vertical axis of the graph indicates the color mixing ratio with the node to the right. When the value is larger, the color between the nodes will be closer to the color of the node to the right. When the value is lower, the color between the nodes will be closer to the color of the selected node.
·Clicking on the curve allows you to add up to 16 points. which you can drag to adjust the mixing rate curve. To delete a control point, drag it outside the graph.


