


Functions of Material Palettes
This section describes the functions of the Material palette.
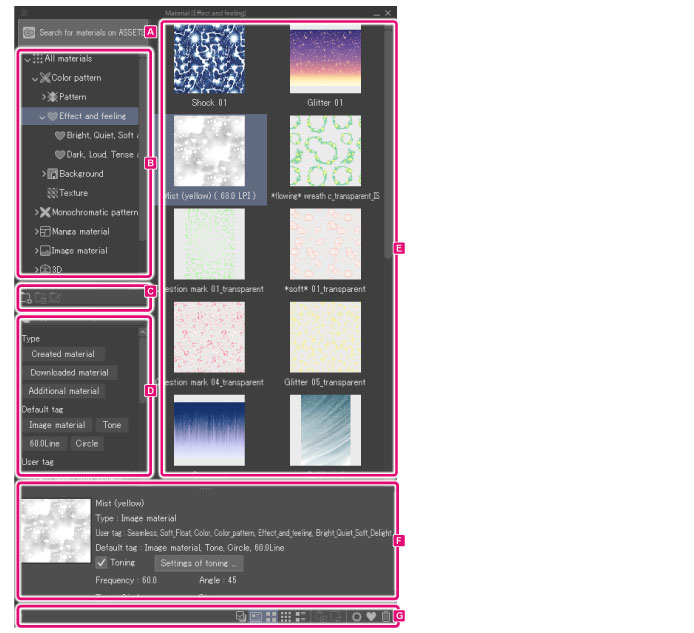
A.Search for materials on ASSETS
Click to launch the portal application Clip Studio which will show Clip Studio Assets. Materials published in Clip Studio ASSETS can be downloaded to Clip Studio Paint.
|
|
The portal application Clip Studio will open and materials downloaded from Clip Studio Assets will be registered to the [Download] folder. |
B.Tree View
Displays the Material palettes hierarchically. Double clicking the folder or folder name part expands the sub-folders.
|
|
·The portal application Clip Studio will open and materials downloaded from Clip Studio Assets will be registered to the [Download] folder. ·Clip Studio Assets can be launched from [Search for Additional Materials]. ·Drag vertically while pressing the space bar to scroll through the tree display. |
C.Show command bar for material folders
Adds or deletes a Material Folder from the [Tree View].

(1) Create Material Folder
Creates a new folder in [Tree view].
(2) Rename Material Folder
Renames the selected folder in [Tree view].
|
|
Default folders cannot be renamed. |
(3) Delete Material Folder
Deletes the selected folder in [Tree view].
|
|
·Default folders cannot be deleted. ·Deleting a folder deletes the materials inside. |
D.Tag List
Displays tags assigned to materials as a list of buttons. It also allows for keyword input to search for a material.

(1) Search box
Enter a keyword to search for a material registered in the open Material palette.
(2) Tag list
A list of tags assigned to materials displayed as buttons. Clicking a button displays the included materials in [Material list]. [Type] are tags automatically attached to Materials depending on how they were obtained. [Default tags] are tags automatically attached to Materials depending on their type. User tags are tags attached to Materials.
|
|
·Drag vertically while pressing the space bar to scroll through the tag list. ·User tags can be added from the [Material property] dialog box. Shows the [Material property] dialog box from the Command Bar’s [Material property]. |
E.Material List
Displays the list of materials registered in the open Material palette.
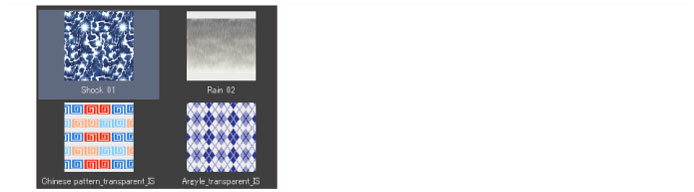
A listed material can be selected from the list and pasted to the canvas by either of the methods below.
·Drag and drop the thumbnail to the canvas
·Drag and drop the thumbnail to the Layer palette
·Select the thumbnail and click [Paste material] of [Command Bar]
|
|
·A cloud icon with an arrow may be displayed in the top right corner of the material. This icon is displayed if the material data only exists in the cloud. A confirmation message is displayed when you drag and drop the material to the canvas. Click [Yes] to open Clip Studio and start downloading the material. After downloading, the material can be used as normal. ·Some materials may have a “no” icon (circle-backslash symbol) in the top right corner. This icon will be shown on materials that cannot be used in your version of Clip Studio Paint. Click the icon to show the reason why the material cannot be used in Clip Studio Paint. ·Hover the mouse over the thumbnail of a material downloaded from Clip Studio Assets to display the icon at the top-right of the material. Click this to launch Clip Studio Assets and display the material information. |
|
|
·When the selected material is a sub tool, you can import the sub tool by dragging and dropping to the Sub Tool palette. ·When the selected material is a color set, you can import the color set by dragging and dropping to the Color Set palette. ·If the selected material is an auto action set, the auto action set can be loaded to the Auto Action palette by dragging and dropping the material. ·Drag vertically while pressing the space bar to scroll through the material list. ·Materials registered to [Favorites] will show an icon before the Material name. |
F.Detailed Information of Material
Displays information on the material selected on the [Material list]. It also allows for configuring toning settings for the selected material.
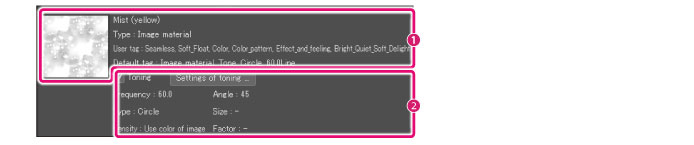
(1) Material info. view
Displays information on the material selected on the [Material list].
(2) Toning [PRO/EX]
When turned on, pasting the material selected on the [Material list] to the canvas displays the material in black and white halftone dots (toned).
Clicking [Settings of toning] opens the [Simple tone settings] dialog box. On the dialog box, you can configure settings related to toning in detail. The configured settings are previewed in the lower part of the palette.
|
|
·For details on the [Simple tone settings] dialog box, see "Simple tone settings Dialog Box [PRO/EX]". ·With the Layer Property palette, tone settings can be changed even after the material is pasted to the canvas. For details, see "Layer Property Palette [PRO/EX]". |
G.Command Bar
You can use the command bar to adjust how materials are displayed. The commands here also help to organize your materials.

(1) Show item checkbox
Shows a checkbox for each thumbnail of the materials shown in [Material list]. You can select a material by turning on the checkbox.
(2) View Material Details
Displays/hides the material details.
(3) Thumbnail [Large]
Shows the large thumbnails of the materials shown in [Material list].
(4) Thumbnail [Small]
Shows the small thumbnails of the materials shown in [Material list].
(5) Thumbnail [Detail]
Shows the thumbnails as well as information of the materials shown in [Material list].
(6) Paste material
Pastes the material selected on the [Material list] to the canvas.
|
|
·If the selected material is a sub tool, import to the Sub Tool palette. ·If the selected material is a color set, import to the Color Set palette. ·If the selected material is an auto action set, the auto action set can be loaded to the Auto Action palette. |
(7) Swap material
Replaces the material pasted on the canvas with that selected in the [Material list].
|
|
For details on how to swap materials, see "Swapping a Pasted Material". |
(8) Material property [PRO/EX]
Selecting and clicking a material on the [Material list] opens the [Material property] dialog box.
On the dialog box, you can configure settings such as name, content, paste operation, save destination, tag for search and the like for the material.
|
|
·The [Material property] dialog box also opens when the thumbnail of the material on the [Material list] is double clicked. ·For details on the [Material property] dialog box, see "Material property Dialog Box [PRO/EX]". |
(9) Add to Favorites
Selecting a material on the [Material list] registers it to the [Favorites] Folder. An Favorites icon will be also be added to the Material name.
You can now use Materials registered in the [Favorites] Folder from other folders as well.
If a registered material inside the [Favorites] Folder is already selected, it will be unregistered.
|
|
[Add to Favorites] can also be accessed from Clip Studio’s [Manage materials]. |
(10) Delete material
Deletes the material selected on the [Material list].