


Allocate
Allows you to configure the position of the 3D material when a 3D material is selected with the [Object] sub tool.
|
|
Some settings may not display depending on the selected 3D material. |
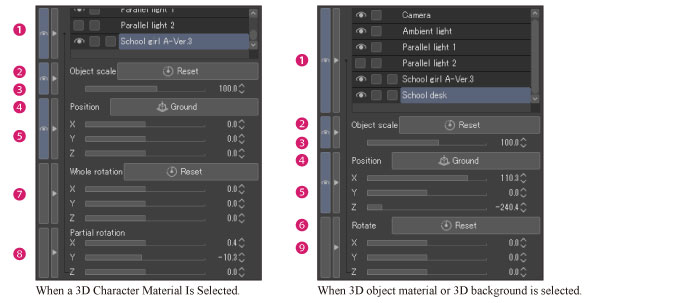
(1) Object List
A list of 3D materials included in the same layer as the 3D material being edited. You can also switch to the camera or light source settings window by selecting a setting item.
|
|
·[Parallel light] and [Ambient light] cannot be configured if a 3D material compatible with Version 1.5 is selected. To configure a light source, see "Light Source" . ·You can scroll through the Object list by dragging on the [Object list] while holding down the [Space] bar. ·In PRO or EX, you can also use the [Object list] category. The [Object list] in the [Object List] catergory can be enlarged. This is useful when you need to select 3D objects with many parts. For details, see "Object List [PRO/EX]" . |

|
(1) Show/Hide |
Toggles between showing/hiding 3D materials and parts included in 3D materials. Hidden 3D materials and parts cannot be edited. [Camera] cannot be configured. |
|
(2) Lock |
Locks 3D materials so that they cannot be edited. Clicking toggles the lock on and off. Please note that even when the lock is On, the camera angle of the entire 3D layer, etc. can still be changed. |
|
(3) Toggle selection |
This enables or disables selection on a 3D material. When selection is enabled, you can select individual parts of 3D materials that contain multiple parts. |
|
(4)Camera |
Select this to switch the [Tool Property] palette and the [Sub Tool Detail] palette’s [Allocate] settings list to the Camera related settings list. For details on settings that can be configured when [Camera] is selected, see "Settings that can be configured when [Camera] is selected" . |
|
(5) Ambient light |
Select this to switch the [Tool Property] palette and the [Sub Tool Detail] palette’s [Allocate] settings list to the Ambient light related settings list. For details on settings that can be configured when [Ambient light] is selected, see "Settings that can be configured when [Ambient light] is selected" . |
|
(6) Parallel light 1 |
Select this to switch the [Tool Property] palette and the [Sub Tool Detail] palette’s [Allocate] settings list to the Parallel light related settings list. For details on settings that can be configured when [Parallel light 1] is selected, see "Settings that can be configured when [Parallel light] is selected" . |
|
(7) Parallel light 2 |
Select this to switch the [Tool Property] palette and the [Sub Tool Detail] palette’s [Allocate] settings list to the Parallel light related settings list. For details on settings that can be configured when [Parallel light 2] is selected, see "Settings that can be configured when [Parallel light] is selected" . |
|
(8) Material name |
Name of the 3D material. Click the material name to switch the edit target to the clicked 3D material. |
|
(9) Open/Close Parts |
Sets whether to display the names of parts included in materials in the [Object List] when loading 3D object materials containing pose parts and 3D materials in LWS format. |
|
(10) Part Name |
Displays the names of parts included in 3D materials when loading 3D object materials containing pose parts and 3D materials in LWS format. Click the part name to switch the edit target to the clicked part. You can change the position and orientation of parts using the drag operation or [Tool Property] palette. |
(2) Reset
This resets a 3D material to its initial state if it has had its size changed using the [Object Scale] or root manipulator.
(3) Object scale
Scales up/down the selected 3D material. Moving the slider to the right scales up the 3D material.

(4) Ground
Grounds the 3D material to the base (floor) of the 3D space.
|
|
Base of the 3D space means the grid displayed when a 3D material is clicked. It is equivalent to the floor of the 3D space. |
(5) Position
Moves the position of the 3D material. This function moves the position of the selected part in a 3D material when 3D object materials containing pose parts or 3D materials in LWS format are loaded.
|
X |
Moves the 3D material horizontally. |
|
Y |
Moves the 3D material vertically. |
|
Z |
Moves the 3D material back and forth. |
(6) Reset
Resets the rotation of a 3D material to its initial state if rotated by the movement manipulator or root manipulator. You can also reset them to their initial state with [Rotate] or [Rotate all].
(7) Whole rotation
Rotates 3D drawing figures and 3D character materials.
|
X |
Rotates 3D drawing figures and 3D character materials along the X axis. |
|
Y |
Rotates 3D drawing figures and 3D character materials along the Y axis. |
|
Z |
Rotates 3D drawing figures and 3D character materials along the Z axis. |
(8) Partial rotation
Rotates the selected part of a 3D drawing figure or a 3D character material.
|
X |
Rotates the selected part in the X-axis direction. |
|
Y |
Rotates the selected part in the Y-axis direction. |
|
Z |
Rotates the selected part in the Z-axis direction. |
|
|
If [Joint angle limit] is turned on for [Pose] on the [Sub Tool Detail] palette, the rotation of a part may be limited. |
(9) Rotate [PRO/EX]
Rotates a 3D object material. If you import a 3D object material containing pose parts or a 3D material in certain formats such as LWS format, you can select a and rotate individual parts.
|
X |
Rotates a 3D object material or a selected part around the X axis. |
|
Y |
Rotates a 3D object material or a selected part around the Y axis. |
|
Z |
Rotates a 3D object material or a selected part around the Z axis. |
Settings that can be configured when [Camera] is selected
When [Camera] is selected from the [Object List], you can configure settings such as the camera angle of 3D layers. To return to the original settings, select the 3D material in the [Object List].
(1) Angle
This setting cannot be configured in this window.
|
|
[Angle] can be set by selecting the [Camera] category of the [Sub Tool Detail] palette. For details, see "Camera" . |
(2) Perspective
Adds perspective to the 3D material.
The larger the value, the larger the angle of view will be. The smaller the value, the smaller the angle of view will be.
|
|
Turn on [Link camera advancing/retreating] to link camera movements with a fixed focal point and focal frame. |
(3) Link camera advancing/retreating
When turned on, this links camera movements when adjusting the perspective.
When turned off, with the camera position fixed, only the angle of view of the canvas camera changes even when the perspective is adjusted.
|
|
In EX, you can check the position of the camera and focal point on the [All sides view] palette. |
(4) Roll
Rotates the camera with its position fixed.
(5) Camera position
Moving the [X], [Y] and [Z] sliders allows you to move the camera position with the focal point fixed.
|
|
In EX, you can check the position of the camera and focal point on the [All sides view] palette. |
(6) Focal point Position
Moving the [X], [Y] and [Z] sliders allows you to move the focal point position with the camera position fixed.
|
|
In EX, you can check the position of the camera and focal point on the [All sides view] palette. |
Settings that can be configured when [Ambient light] is selected
When [Ambient light] is selected from the [Object List], you can configure settings for the ambient light on 3D layers. Ambient light is light that evenly covers a 3D material from all directions. To return to the original settings, select the 3D material in the [Object List].
(1) Color
Configures the color of the ambient light. Clicking the color indicator displays the [Color settings] dialog box.
|
|
For details on the [Color settings] dialog box, see "Advanced settings of color Dialog Box" . |
(2) Intensity
Configures the intensity of the ambient light. The larger the value, the brighter the light will be.
Settings that can be configured when [Parallel light] is selected
When [Parallel light 1] or [Parallel light 2] is selected from the [Object List], you can configure settings for the parallel light on 3D layers. Parallel light is light that covers a 3D material from a specific direction. Up to two parallel light items, [Parallel light 1] and [Parallel light 2], can be configured. To return to the original settings, select the 3D material in the [Object List].
(1) Parallel light direction
Allows you to configure the orientation of the light source of the parallel light by dragging a circle.
|
|
If [Parallel light 1] is selected, this setting is linked to the [Light Source Direction] setting in the [Light Source] category of the [Sub Tool Detail] palette. |
(2) Diffused light color
Configures the color of the diffused light. Clicking the color indicator displays the [Color settings] dialog box.
|
|
For details on the [Color settings] dialog box, see "Advanced settings of color Dialog Box" . |
(3) Diffused light intensity
Configures the intensity of the diffused light. The larger the value, the stronger the diffused light will be.