


Preference
Allows you to configure the display method of the 3D material when a 3D material is selected with the [Object] sub tool, for example.
|
|
Displayed setting items vary depending on the selected 3D material. |

(1) Rendering settings
Click this to display a [Rendering settings] dialog box that can be used to configure settings such as outlines and lighting (light sources) for 3D materials.
For details on the [Rendering settings] dialog box, see "Rendering settings dialog box" .
(2) Physics simulation
Enables/disables physical operation for 3D character materials. When turned on, moving the 3D character causes its hair and skirt to move.
The [Physical simulation] option shows when a 3D character material with physical settings using Clip Studio MODELER or Clip Studio COORDINATE is selected.
|
|
·For details on CLIP STUDIO MODELER, see Clip studio.net. ·Importing a 3D character material with physical settings may slow Clip Studio Paint. Turning off [Physics simulation] may improve the processing speed. |
(3) Physical settings
Click this to display a [Physical settings] dialog box that can be used to configure a method for reflecting physical operations on 3D characters.
For details on the [Physical settings] dialog box, see "Physical settings" .
(4) Display settings for editing
You can set a display method to be used when editing 3D layers. Select [Fast] to speed up the 3D layer display.
However, effects and opacity settings for 3D layers are hidden during operation of 3D layers, as are previews on the [Navigator] palette and blending modes set for the canvas.
The original display returns when editing of the 3D layer is finished.
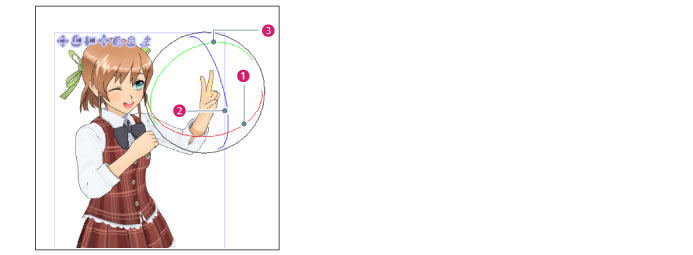
(5) Manipulator
When turned on, this displays the [Manipulator] for a part of a 3D character compatible with Version 1.5. Drag the [Manipulator] to pose a 3D character material or change the angle of a 3D object material.
Aligning the mouse cursor with each ring and dragging it allows you to rotate the selected part in the direction of the ring.
|
(1) Twisted rotation |
Drag along the [Red] ring. Rotates the selected part in the direction of the ring. |
|
(2) Bending rotation (Blue) |
Drag along the [Blue] ring. Rotates the selected part in the direction of the ring. |
|
(3) Bending rotation (Green) |
Drag along the [Green] ring. Rotates the selected part in the direction of the ring. |
|
|
·[Twisted rotation], [Bending rotation (Blue)] and [Bending rotation (Green)] are displayed only when rotation is possible in the relevant direction. ·The [Manipulator] is an item displayed when a 3D character material compatible with Version 1.5 is selected. The [Manipulator] is displayed automatically when a normal 3D character material is clicked. |
Rendering settings dialog box
A.Outline
You can configure outline settings for the selected 3D material.
(1) Add outline
When turned on, this adds an outline to the selected 3D material.
(2) Width
Configures the width of the outline. The larger the value, the thicker will be the outline.
(3) Opacity
Configures the opacity of the outline.
(4) Offset Amount
A polygon offset amount can be set for 3D materials and applied to the outline.
Changing this value changes whether or not an outline embedded in other polygons is displayed.
(5) Color
Configures the color of the outline. Clicking the color indicator displays the [Color settings] dialog box.
|
|
For details on the [Color settings] dialog box, see "Advanced settings of color Dialog Box" . |
B.Lighting
You can configure the light source of the selected 3D material.
(6) Apply light source
When turned on, this applies a light source to the selected 3D material.
(7) Method
Allows you to configure how to apply shading. You can select from [Gouraud], [Phong] or [Toon].
(8) Shadow
Applies a shadow to the selected 3D material.
|
|
The [Shadow] settings can also be configured in the [Light Source] category on the [Sub Tool Detail] palette. For details, see "Light Source" . |
C.Texture
You can configure the texture display method for the selected 3D material.
(9) Use texture
When turned on, this displays a texture for the selected 3D material.
(10) Alpha test
Configures an opacity threshold for extraction of textured line drawings from 3D layers. For example, if [Alpha test] is set to "0.5", line drawings with a texture whose [Opacity] is below 50% are not extracted.
D.Backface culling
When turned on, this enables backface culling. The back faces of polygon drawings are omitted.
|
|
·The [Apply light source] settings can also be configured in the [Light Source] category on the [Sub Tool Detail] palette. For details, see "Light Source" . ·Advanced light source settings can also be configured in the [Allocate] category on the [Sub Tool Detail] palette. For details, see "Allocate" . |
E.Clipping planes
Virtual planes from the viewpoint of the camera. There are two types of planes: near planes and far planes. These add effects to the whole of a 3D layer.
(11) Set automatically when resetting camera
When turned on, this automatically applies [Near plane] and [Far plane] settings when the camera position is reset by a function such as [Focus on editing target] in the Object Launcher.
(12) Near plane
Configures the distance of the near plane. Faces (polygons) cannot be drawn closer than this plane.
(13) Far plane
Configures the position of the far plane. Faces (polygons) cannot be drawn further away than this plane.
F.Lighting
You can configure the light source of the entire 3D layer.
(14) Light Source
When turned on, this enables a light source of the entire 3D layer.
G.Apply to all models
Applies the settings in the [Rendering settings] dialog box to all 3D layers on the canvas.
Physical settings
A.Skirt
Configures skirt movement to occur when operating a 3D character material.
|
|
[Skirt] can be configured when a rigid body with a skirt is configured in Clip Studio Modeler. For details on CLIP STUDIO MODELER, see Clip studio.net. |
(1) Gravity
Configures the effect of gravity on the skirt. The larger the value, the greater the effect of gravity will be.
(2) Activeness
Configures the magnitude of the movements of the skirt. The larger the value, the greater the movements of the skirt when the character moves.
(3) Bending spring
Configures how easily the skirt bends. The larger the value, the less easily the skirt bends when the character moves.
B.Ground height
Configures the height at which the skirt begins to bend when it makes contact with the ground.
The skirt will not sink lower than [Ground height] as long as the position of the character's hips is higher than [Ground height].
C.3D layer settings
Configures how physical operation will be reflected on the whole of the 3D layer when a 3D character material is operated.
(4) Physical operation for skirt only
Reflects the physical operation only in the skirt. Other physics operations are not reflected in Clip Studio Paint.
D.Apply to all models
Applies the settings in the [Physical settings] dialog box to 3D character materials on all 3D layers in the canvas.